
Abode... Grrrr..
Did you know a company called Affinity is free. It is possible to print Stokx Patterns without expensive adobe subscriptions.
My lovely tech friend compiled this guide.
Affinity printing instructions
Printing with Tiled Layout
Step-by-Step Tiling Process
-
Open the Print Dialog
- Go to File > Print
- Select Your Printer
- Choose your home printer from the dropdown
- Verify the paper size is set correctly (A4: 210mm × 297mm)
- Scale: Keep at 100% (very important for pattern accuracy!)
-
-
Access Tiled Printing
- In the Print Options pop-up menu (macOS) or dialog (Windows), select Document Layout
- From the Layout category on the left
- Change the Model dropdown from "Single" to "Tiled"
-
Configure Tile Settings
- The software will automatically calculate how many A4 pages are needed
- You should see a preview showing the grid of pages
-
Check the Preview
- Make sure your pattern is fully covered by the tile grid
- All pages should show portions of your design
- If you see a pink overlay, there's a paper size mismatch - check your printer settings
-
Print
- Click Print to send all pages to your printer
If you have been having trouble using the poster function on your printers.
ANOTHER UPDATE .. 13/4/25
Thank you Ulrika for finding yet another solution.
A BIG THANK YOU!!!
I have this information c/o one of my customers who saw me wringing my hands and yanking at my hair when I had just updated the software on my Mac and then ...Adobe didn´t work. Not only did she hold my hand through this stressful process; she also found several solutions .to the problems you have been having using the poster function on your printers.
SOLUTION 1
Important Update About Printing Patterns
We’ve recently been made aware of a change in Adobe Acrobat that may affect how you print your patterns at home.
What’s going on?
Adobe has removed the Poster (tiling) print option from the latest version of their free Acrobat Reader. This feature allowed you to print large-format patterns across multiple sheets of paper and assemble them at home.
Why did this happen?
With a recent update, Adobe moved several advanced print features—including tiling—to their paid version, Acrobat Pro. As a result, users of the free version no longer have access to this option.
The workaround (for Mac users):
If you’re on a Mac, you can restore the tiling feature by installing an earlier version of Acrobat Reader. Here’s how:
-
Go to the Adobe Acrobat Reader download page: https://get.adobe.com/reader/otherversions/
-
For Operating System, select: Mac OS 10.15–11.x
-
Choose your preferred language
-
For Version, select: Reader 2024.004.20272 for Mac
-
Customer feedback: However, I had to choose a MacOS version below the one you suggested in your blog post to get it to work: MacOS 10.14, version 2022.001.20112 – this information might be useful for others, I guess.
-
Click Download Now and follow the install instructions.
Once installed, you should see the Poster option return when printing, so you can tile and assemble your patterns just like before.
We will also check what to do for PC users and let you know; Although it is probably the same procedure.
SOLUTION 2
Have you heard of the vector software Affinity?
It can do all the things Adobe Illustrator can do and costs a one time fee.
It also allows the Poster function on your printer.
My source has used the software and doesn´t use Adobe any more.
And no, she doesn´t own the company.
SOLUTION 3
SOLUTION 4
SOLUTION 5
The Stokx Grid is there for several reasons.
- The patterns are full sized PDFs they are formatted for a 90cm large format printers or for A0 printers. If you would like to print them at home ,and use the poster function on your printer, the grid will enable you to reassemble the patterns because of the familiar letter and number system. It is also possible to use larger paper; A3 for example.This makes putting the pattern together much faster.
- It is a dream to make the grid interactive. If the pattern pieces are lined up on an X and Y axis changing the length and width of the pieces, so that. all the adjoining pieces grow or shrink too... would be possible.
- The grid is to scale one large square equals 10cm x 10cm. It is possible to plan the best use of your material because you can lay up your pieces in a mini version. My tip: use the A0 file for this because the scale doesn´t change.
- I have a patent.
- Eventually we will make the grid a layer on all patterns so you can use them as projector files
Changing all of the patterns to be printer on American letter size or A4 is not only outrageously expensive.. It feels like a back ward step.
When Abode changed what had always been a free feature... I felt helpless so I am grateful for some workable solutions.
Here is the information that can be found under Tools if you haven´t found it yet.
How to Print
-
ENGLISH
-
DEUTSCH
When you have bought a Stokx Pattern you have a few different options for printing it, you can print A1, A2, A3, A4, A0 or American letter format.
You can choose to only print your own size or all the sizes.
Follow along with the images in the carousel and the steps below on how to print:
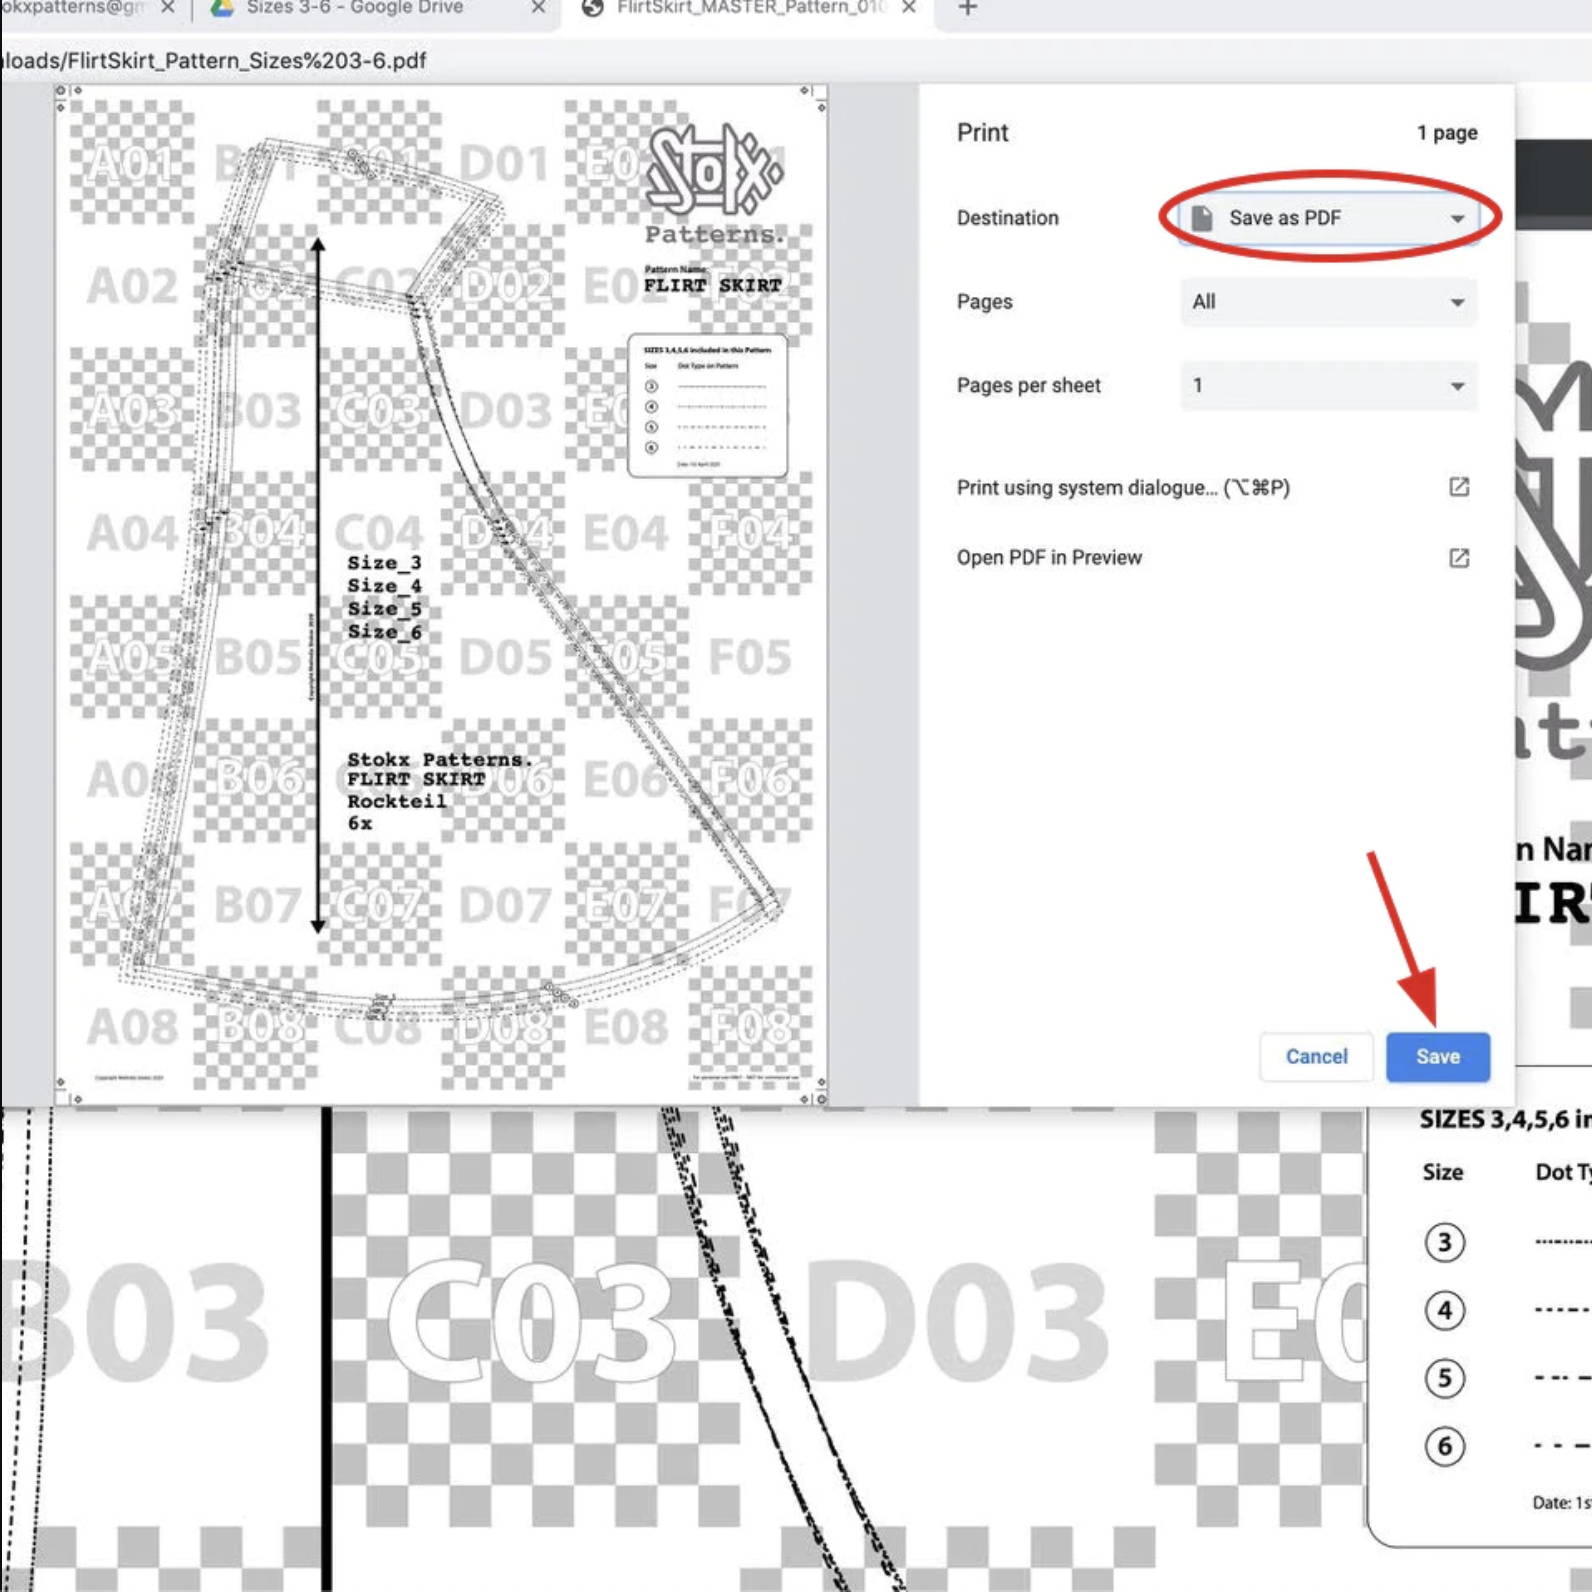
Step 1: Download as a PDF.
Step 2: Open in Adobe Acrobat Reader.
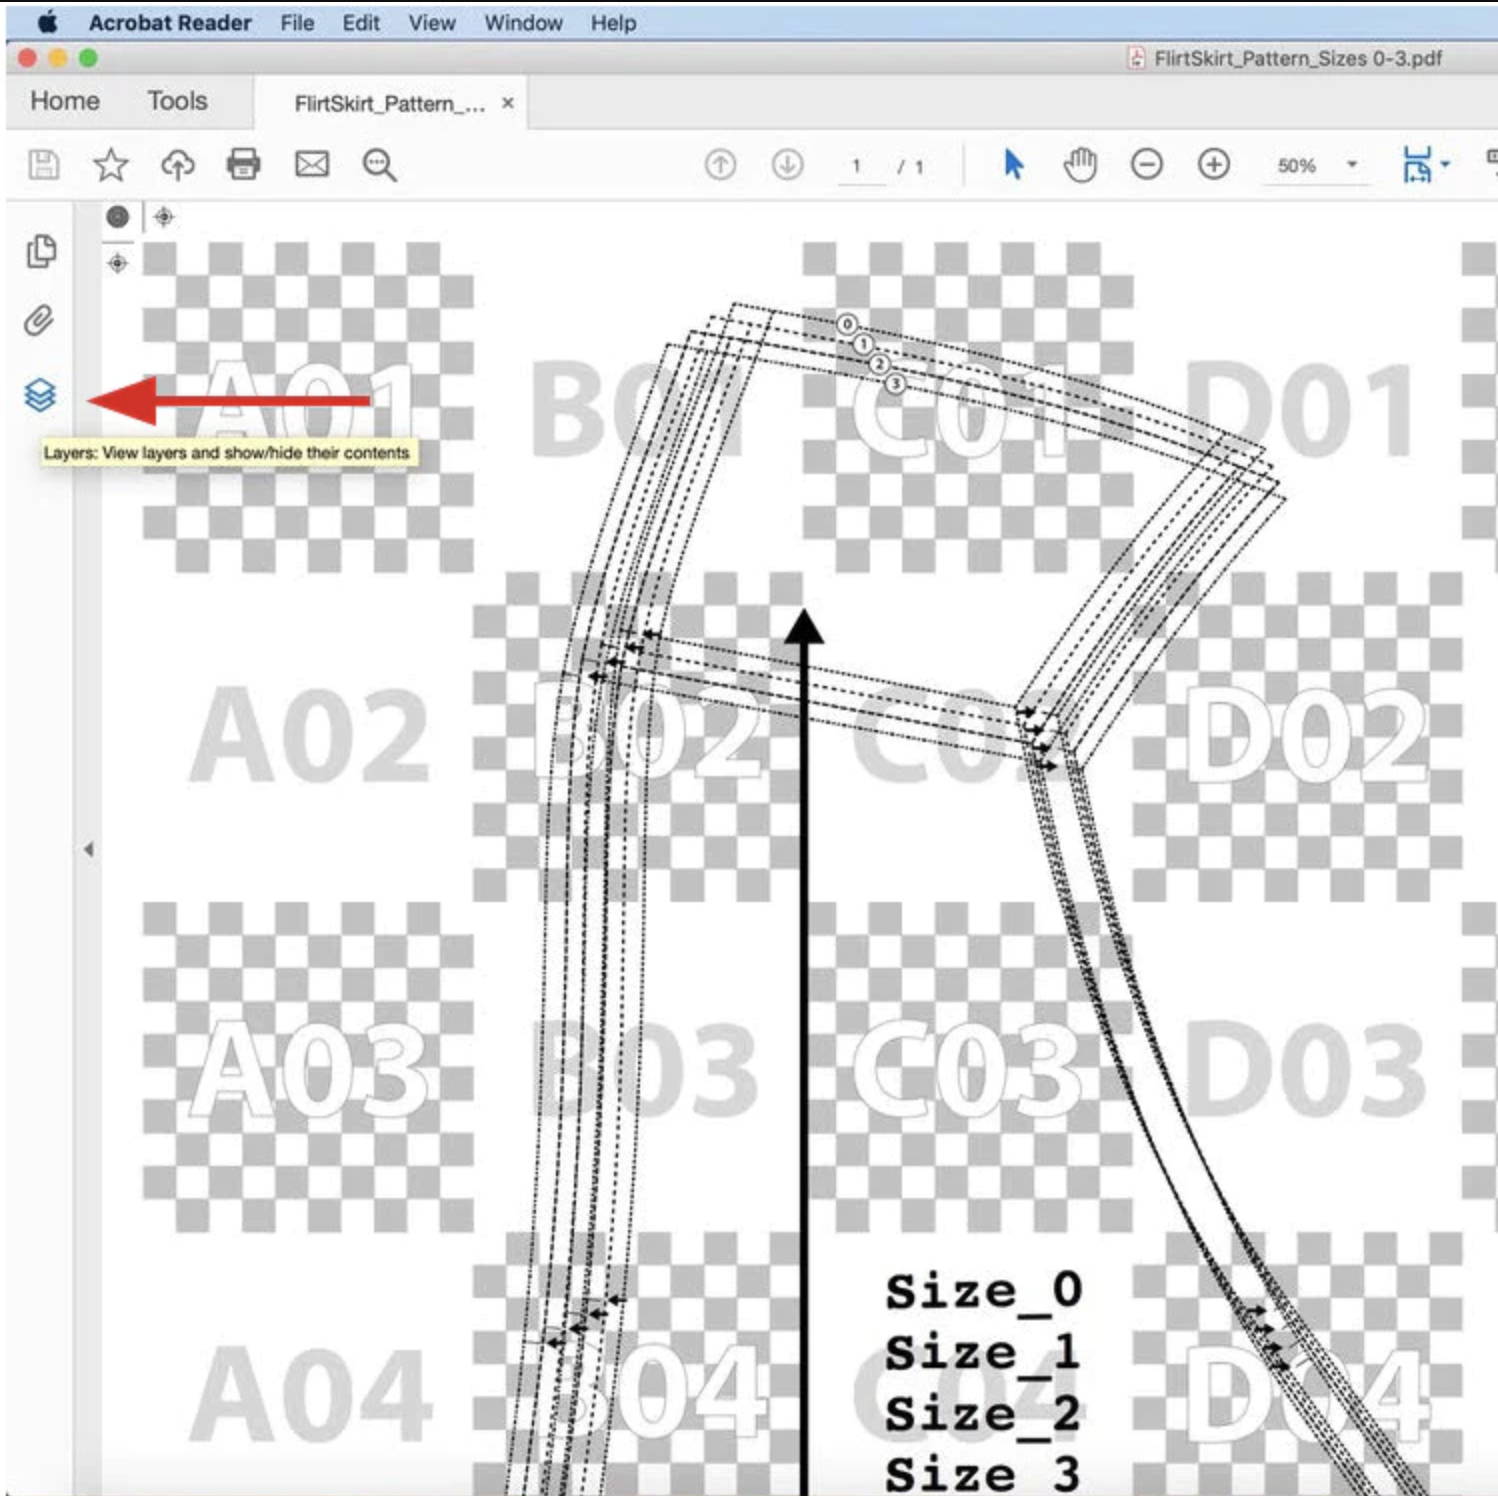
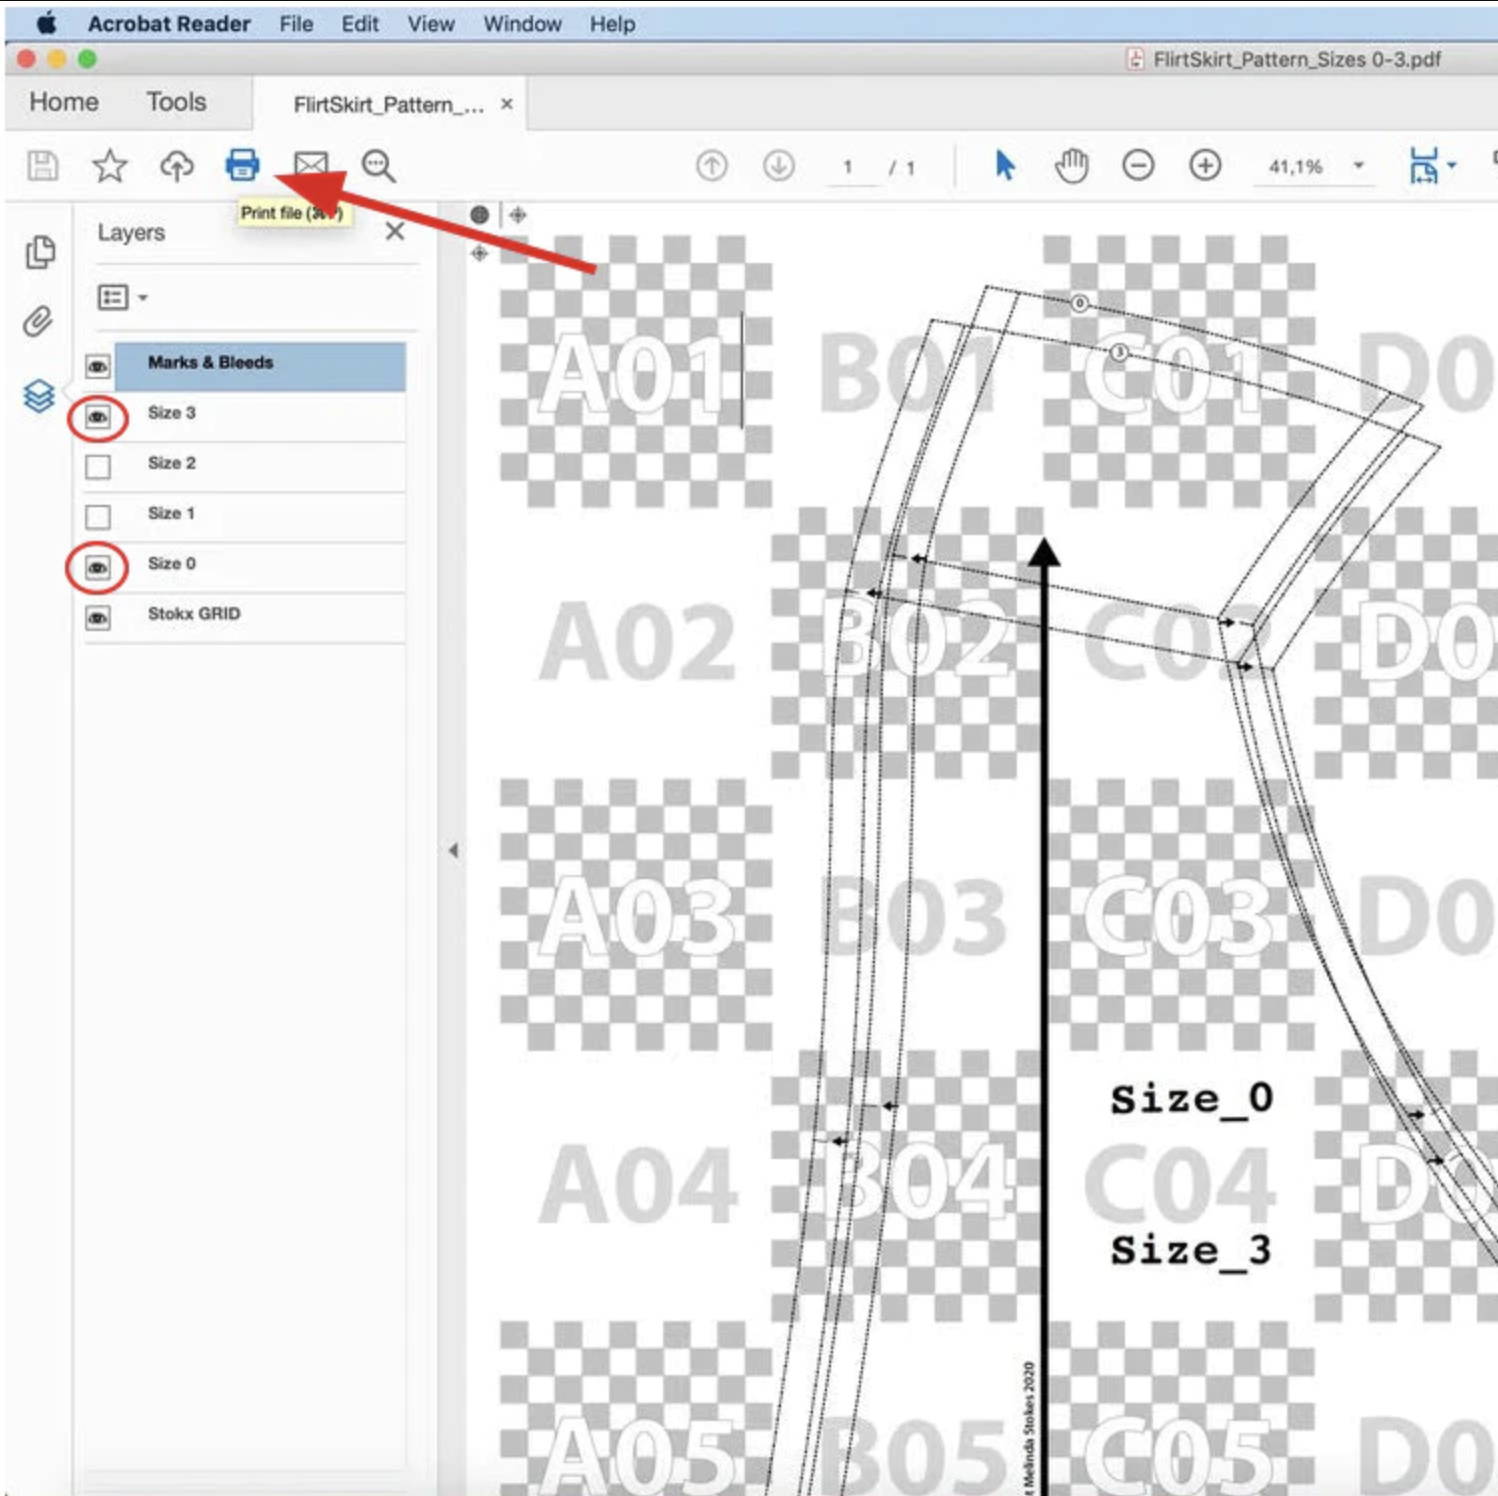
Step 3: Activate the layer symbol on the left hand side.
Step 4: Choose the desired size or sizes by opening or shutting the eye icon.
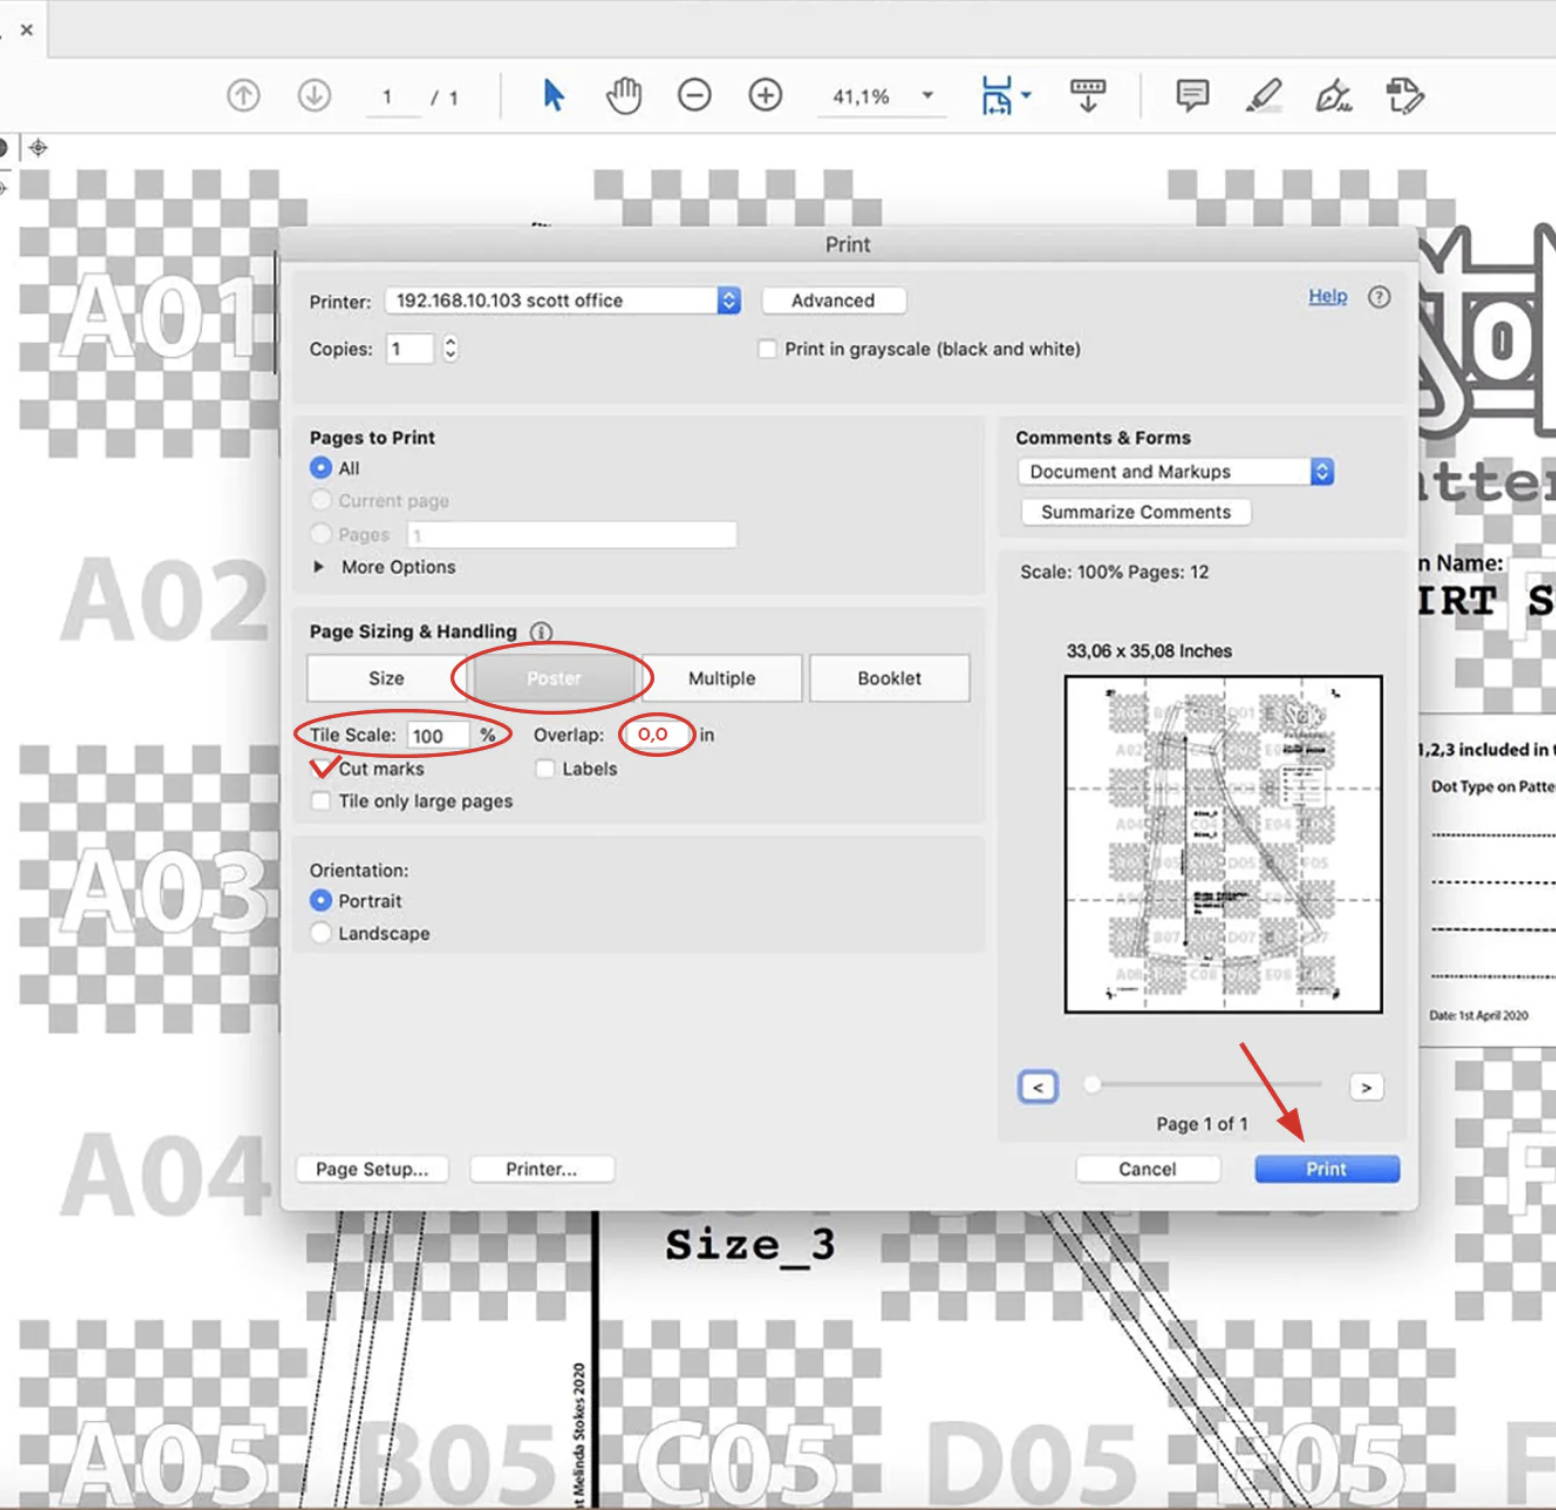
Step 5: Select "Poster" and "100%, do not scale" and "cut marks".
This is the same, regardless of the size of your paper (from A0-A4). Your printer will automatically put overlap around the pages AND add the cutting marks.
Step 6: Print.
Wenn Sie ein Stokx-Muster gekauft haben, haben Sie verschiedene Möglichkeiten, es auszudrucken. Sie können A1, A2, A3, A4, A0 oder das amerikanische Letter-Format drucken. Sie können wählen, ob Sie nur Ihre eigene Größe oder alle Größen drucken möchten.
Folgen Sie den Bildern im Karussell und den nachstehenden Schritten, um zu erfahren, wie Sie drucken können:
Schritt 1: Download als PDF-Datei.
Schritt 2: Öffnen Sie es in Adobe Acrobat Reader.
Schritt 3: Aktivieren Sie das Ebenensymbol auf der linken Seite.
Schritt 4: Wählen Sie die gewünschte(n) Größe(n), indem Sie das Augensymbol öffnen oder schließen.
Schritt 5: Wählen Sie "Poster" und "100%, nicht skalieren" und "Schnittmarken".
Dies ist unabhängig von der Größe Ihres Papiers (von A0-A4) gleich. Ihr Drucker wird die Seiten automatisch überlappen lassen UND die Schnittmarken hinzufügen.
Schritt 6: Drucken.
How to Assemble


-
ENGLISH
-
DEUTSCH
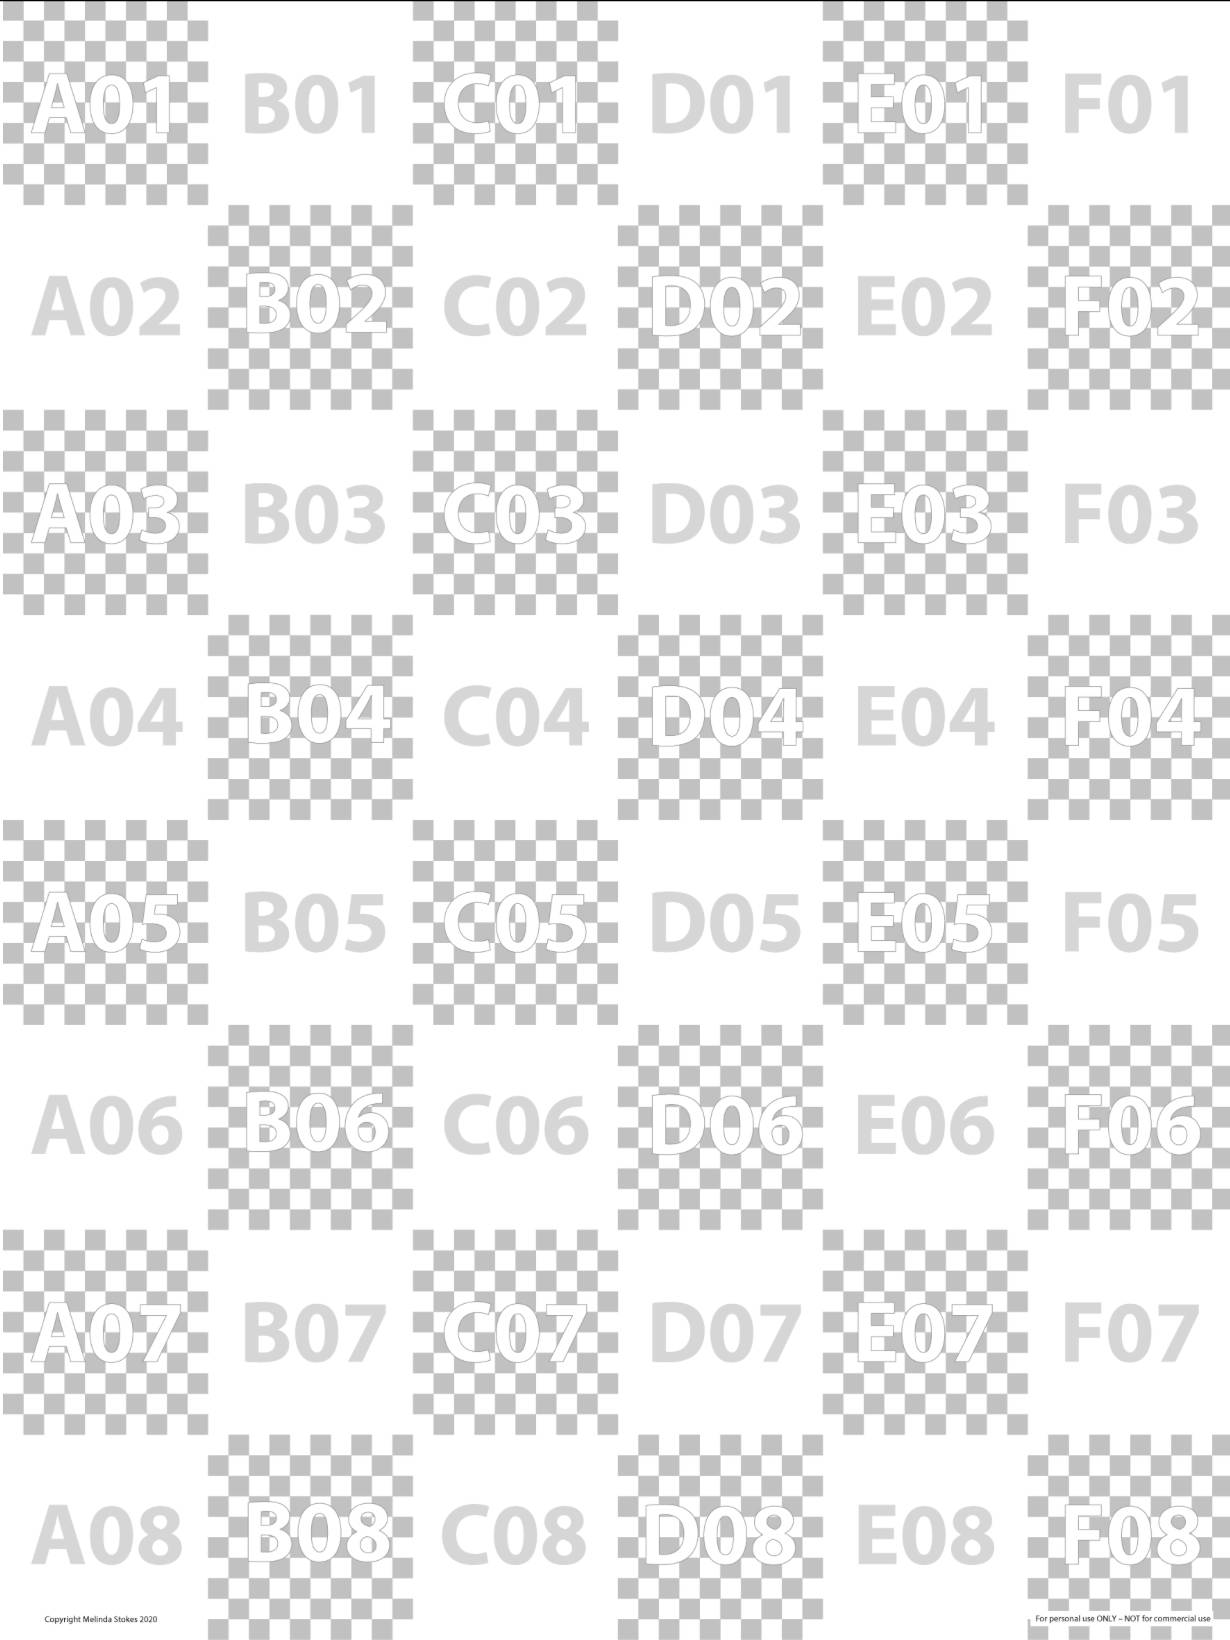
The Grid System is a layer underneath the patterns.
The squares measure 10cm x 10cm with every second square being made up of a mini-grid, so it is easy to check that your printer is printing to scale. It makes it possible to print out the patterns on any size paper.
The regular squares are labeled with coordinates, like a map. The alphabet runs across the grid and numbers go down the grid.
With this system in mind, it is possible to reassemble the printed pages of the patterns.
The coordinate system shows which way up the pages should be and where they belong.
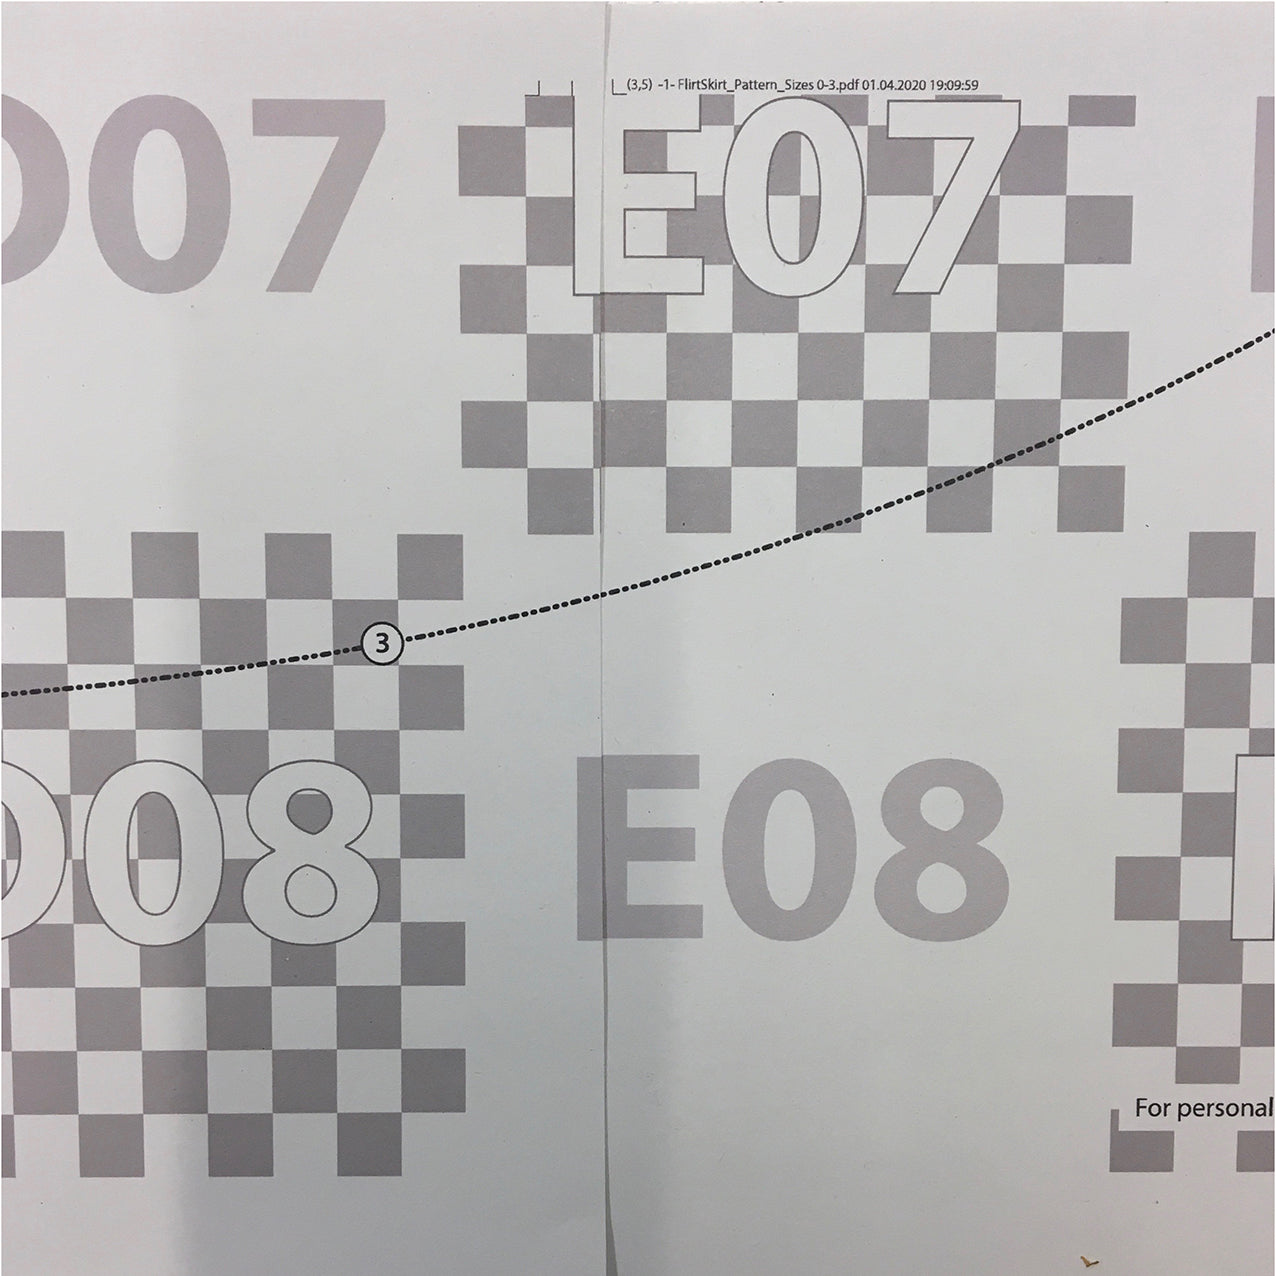
Matching up the grid makes joining the pattern precise.
Trim the pages so that the pages can joined together using the multiple reference points.
TIP: Join all the horizontal rows together, trim the unnecessary overlap; then join all the rows together, checking the numbers as you go.
TIP: Printing onto A3 paper goes much faster!
A copy shop is faster still!
Das Rastersystem von Stokx ist eine Ebene, die unterhalb der Schnittmuster liegt.
Die Quadrate sind 10 x 10 cm groß, jedes zweite Quadrat besteht aus einem Mini-Raster. Damit lässt sich leicht überprüfen, ob der Ausdruck den richtigen Maßstab hat. Durch das Stokx-Raster können die Schnitte auf jede Papiergröße gedruckt werden.
Die Quadrate sind wie ein Stadtplan mit Koordinaten versehen. Die Querreihen sind alphabetisch bezeichnet, die Längsreihen durchnummeriert.
Mit diesem System können die Schnittmuster-seiten leicht wieder zusammengesetzt werden.
Das Koordinatensystem zeigt die Richtung und die Platzierung der Seiten.
Die Rasterlinien aufeinander abstimmen und die Seiten präzise zusammenfügen.
Seitenränder abschneiden, so dass die Seiten anhand der Bezugspunkte verbunden werden können.
Tipp: Verbinde zuerst alle waagerechten Reihen, schneide die überflüssigen Seitenränder ab und verbinde alle Reihen miteinander.
Tipp: Bei einem Ausdruck auf A3-Papier geht es viel schneller!
Ein Copyshop (A0) ist noch schneller!
Project Planning Hack

-
ENGLISH
-
DEUTSCH
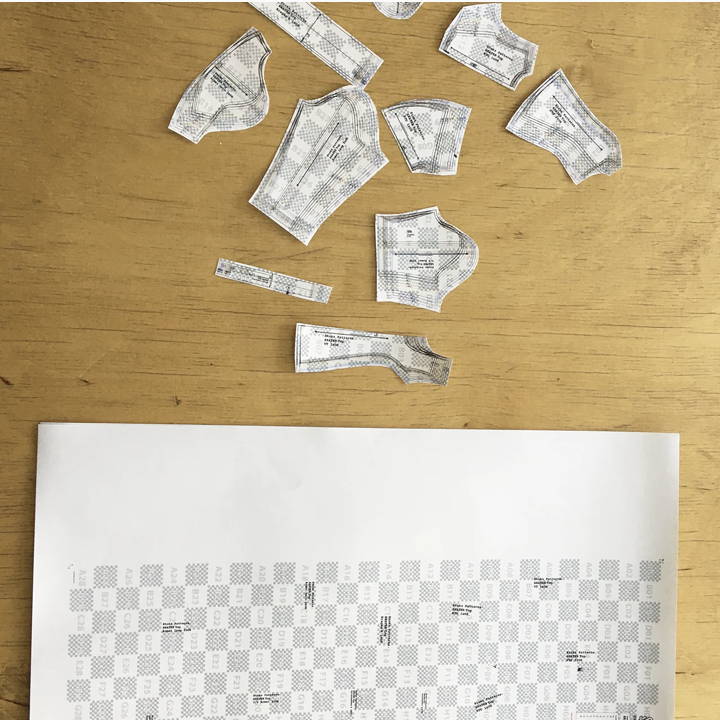
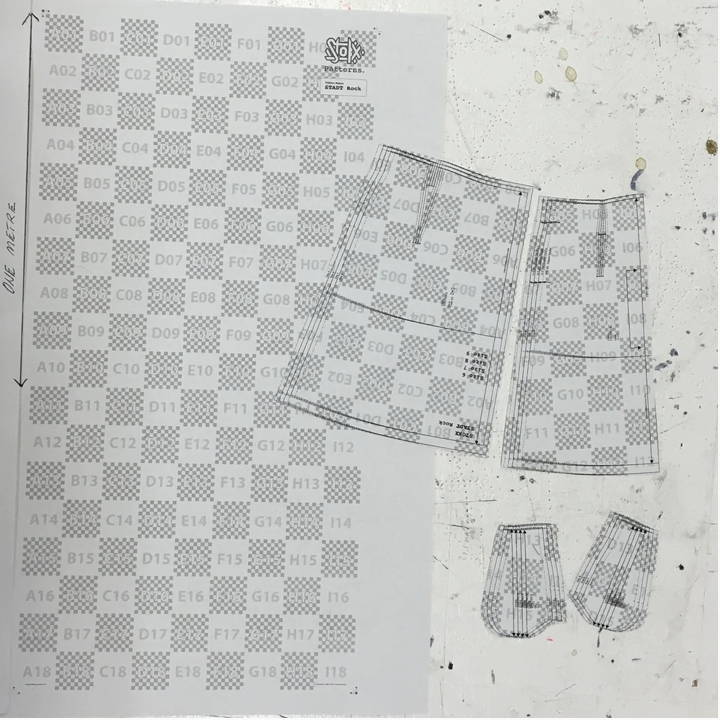
It is possible to plan your project accurately. Print out the pattern in miniature, once with the pattern pieces and once without. Cut out and adjust your pattern in mini: if you want to lengthen it, make it in contrasting fabrics, etc.
You can use the grid to estimate how much cloth you will need because each square of the grid represents 10 cm.
Das Projekt lässt sich mit dem Stokx-Raster präzise planen. Drucke den Schnitt verkleinert aus (auf Seitengröße anpassen), einmal mit Schnittteilen, einmal ohne. Schneide die Schnittteile aus und passe die Mini-Version an: Verlängere sie, wähle verschiedene Stoffe für die Schnittteile…
Nutze das Raster, um zu bestimmen, wie viel Stoff du brauchst – jedes Karo des Rasters entspricht 10 cm.
2 comments
For PDF pattern printing in full AO size, in the U.S. I can recommend PDF Plotting in Richmond, Virginia; online at https://pdfplotting.com/.
I’ve used them since at least 2019 and never had any problems. Their video on how to order patterns is on their home page.
The few times I’ve had to ask anything their response time, either by phone or email, was quick, accurate, and courteous.
Hope this helps!
Wow, Lindy! What a great multi-lingual, detailed set of explanations & instructions !!! THANK YOU!
———
Stokx Patterns replied:
I realty hope it will help. The next step would also be to gather good reliable businesses who can print 👋👋
STOKX STUDIO & SHOP Steinstr 26 10119 Berlin
P: +49 30 28045268 @: www.stokx.de